第八章|WebCodecs 视频处理实战:浏览器端视频处理 Pipeline
把用户上传 MP4、demux、VideoDecoder、Canvas/WebGL/WebGPU 逐帧处理、VideoEncoder、mux 输出串成完整浏览器端视频处理链路,并解释 WebCodecs 与容器、Muxer、MSE 的边界。
第八章|WebCodecs 视频处理实战:浏览器端视频处理 Pipeline
1. 本章学习目标
学完这一章,你要能把前面几章的知识串成一条真正的浏览器端视频处理链路:
用户上传 MP4
  ↓
读取 ArrayBuffer
  ↓
Demux:从 MP4 里拆出视频 sample
  ↓
VideoDecoder:压缩视频帧 → VideoFrame
  ↓
Canvas / WebGL / WebGPU:逐帧处理,比如加水印、灰度、缩放、裁剪
  ↓
VideoEncoder:VideoFrame → EncodedVideoChunk
  ↓
Mux:重新封装成 MP4 / WebM,或者通过 MSE 播放
  ↓
下载 / 预览 / 上传服务器
这一章不追求写一个工业级剪辑器,而是要让你能回答三个非常面试向的问题:
- 浏览器里如何给一个 MP4 视频加水印?
- WebCodecs 在这个流程里负责什么,不负责什么?
- 为什么只拿到 EncodedVideoChunk 还不能直接保存成
.mp4文件?
WebCodecs 的定位要先摆正:它提供的是浏览器里的低层音视频编解码接口,而不是完整播放器、不是 FFmpeg 替代品、也不是容器解析器。W3C 规范明确说 WebCodecs 定义的是音频、视频、图像编解码接口,并且不要求浏览器必须支持某个具体 codec;MDN 也把它描述为按 raw/encoded 数据对象进行转换的 API,比如 VideoDecoder 把 EncodedVideoChunk 解成 VideoFrame,VideoEncoder 再把 VideoFrame 编成 EncodedVideoChunk。(W3C)
本章速览
这章把前面所有概念串成一个浏览器端视频处理任务:
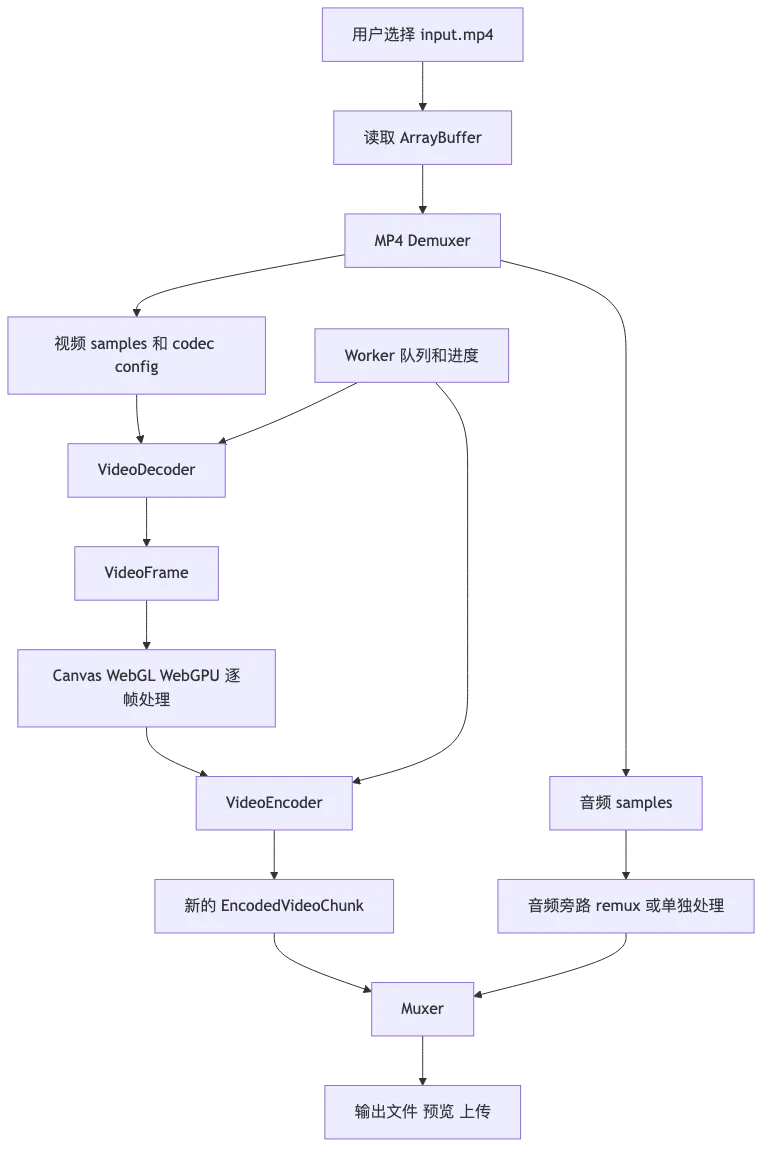
本章可以先记住三个工程结论:
- 给 MP4 加水印不是“改文件名”或“改 metadata”,而是 video track 的 demux、decode、逐帧处理、encode 和 mux。
- 音频可以先走旁路 remux,只要处理不改变整体时长;如果要混音、变速或降噪,就要进入音频 decode / process / encode。
- 视频处理要放进 Worker,并用 queue size、progress、及时
close()和错误恢复来守住性能与内存边界。
2. 本章大图:一条浏览器端视频处理 Pipeline
先用“厨房流水线”类比一下:
| 视频处理步骤 | 厨房类比 | 技术含义 |
|---|---|---|
| MP4 文件 | 打包好的便当盒 | 容器,里面可能有视频、音频、字幕、元数据 |
| Demux | 拆便当盒 | 从 MP4 里拆出视频 sample、音频 sample |
| Decode | 把冷冻食材解冻 | 把 H.264 / VP9 等压缩数据解码成原始帧 |
| Process | 加调料、摆盘 | 给每一帧加水印、滤镜、裁剪、缩放 |
| Encode | 重新压缩包装食材 | 把处理后的原始帧重新编码成压缩帧 |
| Mux | 重新装回便当盒 | 把编码后的视频和音频封装成 MP4 / WebM |
| Download / Preview | 出餐 | 下载文件或在 <video> 里预览 |
完整流程图:
┌────────────────────────────┐
│ 用户选择 input.mp4          │
└──────────────┬─────────────┘
               │ file.arrayBuffer()
               ▼
┌────────────────────────────┐
│ MP4 Demuxer                │
│ - 解析 ftyp/moov/mdat       │
│ - 找到 video track          │
│ - 读取 samples              │
│ - 得到 codec config         │
└──────────────┬─────────────┘
               │ EncodedVideoChunk
               ▼
┌────────────────────────────┐
│ VideoDecoder               │
│ - H.264/VP9/AV1 → VideoFrame│
└──────────────┬─────────────┘
               │ VideoFrame
               ▼
┌────────────────────────────┐
│ Frame Processor            │
│ - drawImage 到 Canvas       │
│ - 加水印                    │
│ - 灰度/缩放/裁剪            │
│ - new VideoFrame(canvas)    │
└──────────────┬─────────────┘
               │ processed VideoFrame
               ▼
┌────────────────────────────┐
│ VideoEncoder               │
│ - VideoFrame → encoded chunk│
│ - 控制码率、帧率、关键帧      │
└──────────────┬─────────────┘
               │ EncodedVideoChunk
               ▼
┌────────────────────────────┐
│ Muxer / MSE                │
│ - 封装成 MP4/WebM           │
│ - 或 append 到 SourceBuffer  │
└──────────────┬─────────────┘
               ▼
          输出文件 / 预览
一句话记忆:
Demuxer 负责把容器拆开,WebCodecs 负责编解码,Canvas/WebGL/WebGPU 负责画面处理,Muxer 负责重新装回容器。
3. 项目职责边界
第 7 章已经详细解释过 WebCodecs 的对象和方法,本章不再重复定义。放到视频水印项目里,只需要记住这张职责表:
| 模块 | 负责 | 不负责 |
|---|---|---|
| Demuxer | 从 MP4 读出视频 sample、timestamp、keyframe、codec config | 解码像素 |
| WebCodecs | EncodedVideoChunk ⇄ VideoFrame | 解析 MP4、生成 MP4、管理完整剪辑时间线 |
| Canvas / WebGL / WebGPU | 对 VideoFrame 做水印、滤镜、缩放、裁剪 | 压缩编码 |
| Muxer | 把编码后的视频和旁路音频写回 MP4 / WebM | 改画面内容 |
| 业务层 | 进度、错误恢复、能力检测、Worker 通信、音画同步策略 | 底层 codec 实现 |
这章真正新增的是:如何把这些模块接成一个能跑的浏览器端 pipeline。
4. 本章案例:给上传的 MP4 视频加水印
本章设计一个浏览器端 demo:
用户上传 MP4
  ↓
解析出视频轨
  ↓
解码每一帧
  ↓
把每一帧画到 Canvas
  ↓
右下角加文字水印
  ↓
重新编码
  ↓
封装成新文件
为了降低复杂度,第一版只处理 视频轨。音频有两种策略:
| 策略 | 做法 | 难度 |
|---|---|---|
| 暂时丢弃音频 | 输出无声视频 | 简单,适合第一版 demo |
| 原音频旁路 remux | 不解码音频,只把原音频 sample 重新封装进输出文件 | 中等,要求 muxer 支持 |
| 音频也处理 | AudioDecoder → Web Audio / AudioData → AudioEncoder → mux | 高,放到后面章节 |
第一版项目建议做成:
input.mp4
  ↓
只处理 video track
  ↓
output.mp4 / output.webm
等你把视频链路跑通之后,再加音频轨。
5. 核心数据结构:从 MP4 sample 到 WebCodecs chunk
5.1 Demuxer 输出什么
一个 MP4 demuxer 最少要给我们这些东西:
type DemuxedVideoTrack = {
  id: number;
  codec: string;          // 例如 "avc1.42E01E"、"vp09.00.10.08"
  codedWidth: number;
  codedHeight: number;
  timescale: number;      // MP4 track 自己的时间单位
  description?: ArrayBuffer; // codec-specific config,例如 avcC/hvcC 相关数据
};

type DemuxedVideoSample = {
  data: Uint8Array;       // 压缩后的视频 sample bytes
  dts: number;            // decoding timestamp,单位是 track timescale
  pts: number;            // presentation timestamp,单位是 track timescale
  duration: number;       // 单个 sample 时长,单位是 track timescale
  isKeyframe: boolean;
};
你可以先不用手写完整 MP4 demuxer,真实项目里通常接第三方库。重点是你要知道 demuxer 输出的东西最终会变成:
const chunk = new EncodedVideoChunk({
  type: sample.isKeyframe ? "key" : "delta",
  timestamp: ptsToMicroseconds(sample.pts, track.timescale),
  duration: durationToMicroseconds(sample.duration, track.timescale),
  data: sample.data,
});
WebCodecs 里的 VideoFrame 元数据包含 timestamp、duration、format、resolution 等信息,MDN 文档说明 timestamp 和 duration 使用微秒单位;所以从 MP4 timescale 转 WebCodecs timestamp 时,核心公式就是 value / timescale * 1_000_000。(MDN Web Docs)
function toMicroseconds(value: number, timescale: number): number {
  return Math.round((value / timescale) * 1_000_000);
}
6. Timestamp:这章最容易翻车的地方
视频处理 pipeline 不是“来一帧处理一帧”这么简单,因为每一帧都有时间。
你需要分清:
| 名称 | 含义 | 简单理解 |
|---|---|---|
| DTS | Decode Timestamp | 这一帧什么时候送进解码器 |
| PTS / CTS | Presentation Timestamp | 这一帧什么时候显示 |
| duration | 这一帧持续多久 | 下一帧前它占多少时间 |
| timescale | MP4 轨道时间单位 | 比如 90000 表示 1 秒 = 90000 tick |
| microseconds | WebCodecs 常用时间单位 | 1 秒 = 1,000,000 微秒 |
6.1 没有 B 帧的简单情况
很多简单视频大概是:
解码顺序 = 显示顺序

Frame 0: DTS 0,   PTS 0
Frame 1: DTS 33,  PTS 33
Frame 2: DTS 66,  PTS 66
Frame 3: DTS 99,  PTS 99
这时你几乎感觉不到 DTS / PTS 的区别。
6.2 有 B 帧的情况
有 B 帧时,解码顺序和显示顺序可能不同:
显示顺序:I0  B1  B2  P3
解码顺序:I0  P3  B1  B2
因为 B 帧可能依赖未来的 P 帧,所以解码器要先看到 P3,才能还原 B1、B2。
这时你的原则是:
按 DTS 顺序喂给 VideoDecoder
但 EncodedVideoChunk.timestamp 应该表示 PTS
也就是说:
samples.sort((a, b) => a.dts - b.dts);

for (const sample of samples) {
  decoder.decode(new EncodedVideoChunk({
    type: sample.isKeyframe ? "key" : "delta",
    timestamp: toMicroseconds(sample.pts, track.timescale),
    duration: toMicroseconds(sample.duration, track.timescale),
    data: sample.data,
  }));
}
面试时可以这样说:
对于有 B 帧的视频,解码顺序和展示顺序可能不一致。demuxer 需要提供 DTS 和 PTS。我们通常按 DTS 顺序把 chunk 喂给 decoder,但 chunk 上携带的 timestamp 要用展示时间,也就是 PTS,这样后续渲染、编码、mux 才能维持正确时间线。
7. 处理帧:VideoFrame → Canvas → VideoFrame
最直观的处理方式是 Canvas 2D:
VideoFrame
  ↓ drawImage()
Canvas
  ↓ ctx.fillText() / ctx.drawImage() / getImageData()
处理后的画面
  ↓ new VideoFrame(canvas, { timestamp, duration })
新的 VideoFrame
7.1 加文字水印
示例函数:
type WatermarkOptions = {
  text: string;
  width: number;
  height: number;
};

function addWatermarkWithCanvas(
  frame: VideoFrame,
  canvas: OffscreenCanvas,
  options: WatermarkOptions,
): VideoFrame {
  const ctx = canvas.getContext("2d");
  if (!ctx) {
    throw new Error("Cannot get 2D context");
  }

  const { width, height, text } = options;

  canvas.width = width;
  canvas.height = height;

  // 1. 把原始帧画到 Canvas
  ctx.drawImage(frame, 0, 0, width, height);

  // 2. 画水印
  ctx.font = "28px sans-serif";
  ctx.textAlign = "right";
  ctx.textBaseline = "bottom";

  // 先画半透明背景,提升可读性
  const padding = 16;
  const metrics = ctx.measureText(text);
  const boxWidth = metrics.width + padding * 2;
  const boxHeight = 44;

  ctx.globalAlpha = 0.45;
  ctx.fillStyle = "black";
  ctx.fillRect(
    width - boxWidth - 24,
    height - boxHeight - 24,
    boxWidth,
    boxHeight,
  );

  ctx.globalAlpha = 1;
  ctx.fillStyle = "white";
  ctx.fillText(text, width - 24 - padding, height - 24 - 8);

  // 3. 从 Canvas 重新创建 VideoFrame
  return new VideoFrame(canvas, {
    timestamp: frame.timestamp,
    duration: frame.duration ?? undefined,
  });
}
这个函数做了三件事:
旧 VideoFrame 负责提供原画面
Canvas 负责绘制和加水印
新 VideoFrame 负责送去编码注意:旧 frame 和新 frame 都要在不用时 close。
MDN 的 WebCodecs 使用指南明确提醒,VideoFrame 可能占用大量 GPU 内存,需要尽早 close(),甚至少于 100 个未释放的活跃帧就可能导致应用崩溃;编码时通常可以在 encoder.encode(frame) 后关闭该帧。(MDN Web Docs)
8. 重新编码:VideoFrame → EncodedVideoChunk
VideoEncoder 的工作是把处理后的 VideoFrame 重新压缩。
你需要配置这些参数:
type EncodeOptions = {
  codec: string;      // 例如 "vp09.00.10.08"、"avc1.42E01E"
  width: number;
  height: number;
  bitrate: number;   // 例如 2_000_000 = 2 Mbps
  framerate: number; // 例如 30
};
示例:
const encodedChunks: EncodedVideoChunk[] = [];
const encodedMetadata: EncodedVideoChunkMetadata[] = [];

const encoder = new VideoEncoder({
  output(chunk, metadata) {
    encodedChunks.push(chunk);
    if (metadata) {
      encodedMetadata.push(metadata);
    }
  },
  error(error) {
    console.error("VideoEncoder error:", error);
  },
});

const config: VideoEncoderConfig = {
  codec: "vp09.00.10.08",
  width: 1280,
  height: 720,
  bitrate: 2_000_000,
  framerate: 30,
};

const support = await VideoEncoder.isConfigSupported(config);
if (!support.supported) {
  throw new Error("Current browser does not support this encoder config");
}

encoder.configure(config);
编码时:
let frameIndex = 0;
const keyframeInterval = 60;

function encodeProcessedFrame(frame: VideoFrame) {
  const shouldBeKeyframe = frameIndex % keyframeInterval === 0;

  encoder.encode(frame, {
    keyFrame: shouldBeKeyframe,
  });

  frame.close();
  frameIndex++;
}
MDN 示例也会显式设置关键帧,并提醒要关注 encodeQueueSize:如果你 30fps 地塞帧,但设备只能 10fps 编码,编码队列会持续增长,最后可能耗尽显存或崩溃;因此真实项目必须做 backpressure 控制。(MDN Web Docs)
9. Mux:为什么 EncodedVideoChunk 不能直接保存成 MP4
这个原因第 6、7 章已经讲过:EncodedVideoChunk 是 codec 层数据,MP4 / WebM 是 container 层文件。本章只保留工程动作:
encoded chunks
  ↓ muxer 写 track、timestamp、duration、keyframe、codec config、media data
MP4 / WebM bytes
所以,下面这样是不对的:
const blob = new Blob(encodedChunks, { type: "video/mp4" });这通常不是合法 MP4。你只是把一堆 encoded chunk 拼起来了,没有写容器结构,播放器不知道该怎么解释。
正确做法是:
EncodedVideoChunk[]
  ↓ muxer
MP4 / WebM bytes
  ↓ Blob
download / preview
示意接口:
type MuxedVideoSample = {
  data: Uint8Array;
  timestamp: number; // microseconds
  duration: number;  // microseconds
  isKeyframe: boolean;
};

async function muxToMp4(params: {
  samples: MuxedVideoSample[];
  codec: string;
  width: number;
  height: number;
  timescale: number;
  decoderConfig?: ArrayBuffer;
}): Promise<Blob> {
  // 这里通常调用第三方 muxer。
  // 真正的 muxer 要写 ftyp/moov/mdat/stbl/stts/stsz/stco/stss 等结构。
  throw new Error("Pseudo code: use a real MP4 muxer here");
}
如果不是下载文件,而是边生成边预览,可以走 MSE:MSE 让 JavaScript 构造媒体流,并把一个个媒体 segment append 到 SourceBuffer,再由 <video> 播放。W3C 的 MSE 规范也说明应用会把 data segments 追加到 SourceBuffer,这些数据会作为音频、视频、文本 track buffer 被管理和播放。(W3C)
10. TypeScript 伪代码:完整 Pipeline
下面是一份“工程骨架级”的 TypeScript 伪代码。它不是直接可运行的完整项目,因为 demuxMp4() 和 muxVideoOnly() 需要接具体库,但主流程是对的。
// types.ts

export type DemuxedVideoTrack = {
  id: number;
  codec: string;
  codedWidth: number;
  codedHeight: number;
  timescale: number;
  description?: ArrayBuffer;
};

export type DemuxedVideoSample = {
  data: Uint8Array;
  dts: number;
  pts: number;
  duration: number;
  isKeyframe: boolean;
};

export type DemuxResult = {
  videoTrack: DemuxedVideoTrack;
  videoSamples: DemuxedVideoSample[];
};

export type EncodedOutputSample = {
  data: Uint8Array;
  timestamp: number;
  duration?: number;
  isKeyframe: boolean;
};
// time.ts
export function toMicroseconds(value: number, timescale: number): number {
return Math.round((value / timescale) * 1_000_000);
}// processor.ts
export function addWatermark(
frame: VideoFrame,
canvas: OffscreenCanvas,
text: string,
): VideoFrame {
const width = frame.codedWidth;
const height = frame.codedHeight;
canvas.width = width;
canvas.height = height;
const ctx = canvas.getContext("2d");
if (!ctx) {
throw new Error("Cannot create 2D context");
}
ctx.drawImage(frame, 0, 0, width, height);
const padding = 12;
const margin = 24;
ctx.font = "28px sans-serif";
ctx.textBaseline = "bottom";
ctx.textAlign = "right";
const textMetrics = ctx.measureText(text);
const boxWidth = textMetrics.width + padding * 2;
const boxHeight = 44;
ctx.globalAlpha = 0.45;
ctx.fillStyle = "black";
ctx.fillRect(
width - margin - boxWidth,
height - margin - boxHeight,
boxWidth,
boxHeight,
);
ctx.globalAlpha = 1;
ctx.fillStyle = "white";
ctx.fillText(text, width - margin - padding, height - margin - 8);
return new VideoFrame(canvas, {
timestamp: frame.timestamp,
duration: frame.duration ?? undefined,
});
}// pipeline.ts
import type {
DemuxResult,
EncodedOutputSample,
} from "./types";
import { toMicroseconds } from "./time";
import { addWatermark } from "./processor";
// 伪函数:真实项目中用 MP4 demuxer 实现
declare function demuxMp4(buffer: ArrayBuffer): Promise<DemuxResult>;
// 伪函数:真实项目中用 MP4/WebM muxer 实现
declare function muxVideoOnly(params: {
samples: EncodedOutputSample[];
codec: string;
width: number;
height: number;
framerate: number;
}): Promise<Blob>;
function once(target: EventTarget, eventName: string): Promise<void> {
return new Promise((resolve) => {
target.addEventListener(eventName, () => resolve(), { once: true });
});
}
export async function transcodeWithWatermark(file: File): Promise<Blob> {
if (!("VideoDecoder" in globalThis) || !("VideoEncoder" in globalThis)) {
throw new Error("WebCodecs is not supported in this browser");
}
// 1. 读取文件
const buffer = await file.arrayBuffer();
// 2. Demux MP4
const { videoTrack, videoSamples } = await demuxMp4(buffer);
// 3. 按 DTS 排序,保证解码输入顺序正确
videoSamples.sort((a, b) => a.dts - b.dts);
const outputSamples: EncodedOutputSample[] = [];
const pendingFrameTasks: Promise<void>[] = [];
const width = videoTrack.codedWidth;
const height = videoTrack.codedHeight;
const canvas = new OffscreenCanvas(width, height);
// 4. 创建 encoder
const encoderConfig: VideoEncoderConfig = {
codec: "vp09.00.10.08",
width,
height,
bitrate: 2_000_000,
framerate: 30,
};
const encoderSupport = await VideoEncoder.isConfigSupported(encoderConfig);
if (!encoderSupport.supported) {
throw new Error("Encoder config is not supported");
}
const encoder = new VideoEncoder({
output(chunk) {
const data = new Uint8Array(chunk.byteLength);
chunk.copyTo(data);
outputSamples.push({
data,
timestamp: chunk.timestamp,
duration: chunk.duration ?? undefined,
isKeyframe: chunk.type === "key",
});
},
error(error) {
console.error("Encoder error:", error);
},
});
encoder.configure(encoderConfig);
let frameIndex = 0;
const keyframeInterval = 60;
// 5. 创建 decoder
const decoderConfig: VideoDecoderConfig = {
codec: videoTrack.codec,
codedWidth: videoTrack.codedWidth,
codedHeight: videoTrack.codedHeight,
description: videoTrack.description,
};
const decoderSupport = await VideoDecoder.isConfigSupported(decoderConfig);
if (!decoderSupport.supported) {
throw new Error("Decoder config is not supported");
}
const decoder = new VideoDecoder({
output(frame) {
const task = Promise.resolve().then(async () => {
let processedFrame: VideoFrame | undefined;
try {
processedFrame = addWatermark(frame, canvas, "Demo Watermark");
const shouldBeKeyframe = frameIndex % keyframeInterval === 0;
// Backpressure:不要无限塞给 encoder
while (encoder.encodeQueueSize > 8) {
await once(encoder, "dequeue");
}
encoder.encode(processedFrame, {
keyFrame: shouldBeKeyframe,
});
frameIndex++;
} finally {
// 原始帧和处理后的帧都要释放
frame.close();
processedFrame?.close();
}
});
pendingFrameTasks.push(task);
},
error(error) {
console.error("Decoder error:", error);
},
});
decoder.configure(decoderConfig);
// 6. 送入 decoder
for (const sample of videoSamples) {
while (decoder.decodeQueueSize > 16) {
await once(decoder, "dequeue");
}
const chunk = new EncodedVideoChunk({
type: sample.isKeyframe ? "key" : "delta",
timestamp: toMicroseconds(sample.pts, videoTrack.timescale),
duration: toMicroseconds(sample.duration, videoTrack.timescale),
data: sample.data,
});
decoder.decode(chunk);
}
// 7. 等 decoder 清空
await decoder.flush();
// 8. 等异步帧处理完成
await Promise.all(pendingFrameTasks);
// 9. 等 encoder 输出最后的 chunk
await encoder.flush();
decoder.close();
encoder.close();
// 10. Mux 成文件
const outputBlob = await muxVideoOnly({
samples: outputSamples,
codec: encoderConfig.codec,
width,
height,
framerate: 30,
});
return outputBlob;
}主线程调用:
// main.ts

import { transcodeWithWatermark } from "./pipeline";

const input = document.querySelector<HTMLInputElement>("#file")!;
const button = document.querySelector<HTMLButtonElement>("#start")!;
const link = document.querySelector<HTMLAnchorElement>("#download")!;

let selectedFile: File | null = null;

input.addEventListener("change", () => {
  selectedFile = input.files?.[0] ?? null;
});

button.addEventListener("click", async () => {
  if (!selectedFile) {
    alert("Please select a video file first");
    return;
  }

  button.disabled = true;
  button.textContent = "Processing...";

  try {
    const blob = await transcodeWithWatermark(selectedFile);

    const url = URL.createObjectURL(blob);
    link.href = url;
    link.download = "watermarked-video.webm";
    link.textContent = "Download result";
  } catch (error) {
    console.error(error);
    alert(String(error));
  } finally {
    button.disabled = false;
    button.textContent = "Start";
  }
});
11. 为什么应该放到 Worker 里
视频处理非常吃 CPU / GPU / 内存。主线程还要负责:
响应点击
滚动页面
更新进度条
渲染 React/Vue 组件
处理拖拽
播放预览
如果你在主线程里做 demux、decode、canvas 处理、encode,很容易出现:
页面卡死
按钮点不动
进度条不更新
浏览器提示页面无响应
移动端直接崩
更合理的结构是:
Main Thread
  - 文件选择
  - UI 状态
  - 进度条
  - 预览
  - 下载链接

Worker
  - demux
  - decode
  - frame process
  - encode
  - mux
线程通信大概这样:
Main Thread
  postMessage({ type: "start", file })
      ↓
Worker
  处理视频
      ↓
  postMessage({ type: "progress", value: 0.42 })
      ↓
Main Thread
  更新进度条
      ↓
Worker
  postMessage({ type: "done", blob })
      ↓
Main Thread
  创建下载链接
Worker 版本目录可以这样设计:
src/
  main.ts
  worker/
    video-worker.ts
  media/
    demux/
      mp4-demuxer.ts
    mux/
      mp4-muxer.ts
      webm-muxer.ts
    codecs/
      decoder.ts
      encoder.ts
    process/
      watermark.ts
      grayscale.ts
      resize.ts
    utils/
      time.ts
      support.ts
  ui/
    progress.ts
    preview.ts
Worker 通信类型:
// worker-messages.ts

export type WorkerInputMessage =
  | {
      type: "start";
      file: File;
      watermarkText: string;
    }
  | {
      type: "cancel";
    };

export type WorkerOutputMessage =
  | {
      type: "progress";
      progress: number;
    }
  | {
      type: "done";
      blob: Blob;
    }
  | {
      type: "error";
      message: string;
    };
Worker 示例:
// video-worker.ts

import { transcodeWithWatermark } from "../media/pipeline";
import type {
  WorkerInputMessage,
  WorkerOutputMessage,
} from "./worker-messages";

self.onmessage = async (event: MessageEvent<WorkerInputMessage>) => {
  const message = event.data;

  if (message.type === "start") {
    try {
      const blob = await transcodeWithWatermark(message.file);

      const output: WorkerOutputMessage = {
        type: "done",
        blob,
      };

      self.postMessage(output);
    } catch (error) {
      const output: WorkerOutputMessage = {
        type: "error",
        message: error instanceof Error ? error.message : String(error),
      };

      self.postMessage(output);
    }
  }
};
主线程:
// main.ts

const worker = new Worker(
  new URL("./worker/video-worker.ts", import.meta.url),
  { type: "module" },
);

worker.onmessage = (event) => {
  const message = event.data;

  switch (message.type) {
    case "progress":
      updateProgress(message.progress);
      break;

    case "done": {
      const url = URL.createObjectURL(message.blob);
      showDownloadLink(url);
      break;
    }

    case "error":
      showError(message.message);
      break;
  }
};

function start(file: File) {
  worker.postMessage({
    type: "start",
    file,
    watermarkText: "Demo Watermark",
  });
}
12. 内存管理:VideoFrame.close() 是生死线
视频帧非常大。
一帧 1080p RGBA 大约:
1920 × 1080 × 4 bytes ≈ 8.29 MB如果你手上同时压着 100 帧:
8.29 MB × 100 ≈ 829 MB这还没算 GPU 内存、编码器队列、解码器队列、Canvas buffer、muxer 缓存。
所以真实项目里要遵守这几个规则:
12.1 谁创建,谁负责释放
const processed = new VideoFrame(canvas, {
  timestamp: frame.timestamp,
});

try {
  encoder.encode(processed);
} finally {
  processed.close();
}
12.2 decoder output 里的 frame 用完立刻 close
const decoder = new VideoDecoder({
  output(frame) {
    try {
      // process frame
    } finally {
      frame.close();
    }
  },
  error(console.error),
});
12.3 不要无限缓存 VideoFrame
坏写法:
const frames: VideoFrame[] = [];

decoder = new VideoDecoder({
  output(frame) {
    frames.push(frame); // 很危险
  },
  error(console.error),
});
好写法:
decoder = new VideoDecoder({
  output(frame) {
    processAndEncode(frame);
    // processAndEncode 内部负责 close
  },
  error(console.error),
});
12.4 控制 decodeQueueSize 和 encodeQueueSize
while (decoder.decodeQueueSize > 16) {
  await once(decoder, "dequeue");
}

while (encoder.encodeQueueSize > 8) {
  await once(encoder, "dequeue");
}
12.5 Blob URL 用完释放
const url = URL.createObjectURL(blob);

downloadLink.href = url;

// 不需要时释放
URL.revokeObjectURL(url);
13. 进度条怎么做
最简单的进度:
progress = decodedSamples / totalSamples伪代码:
let decodedCount = 0;
const total = videoSamples.length;

const decoder = new VideoDecoder({
  output(frame) {
    decodedCount++;

    self.postMessage({
      type: "progress",
      progress: decodedCount / total,
    });

    processFrame(frame);
  },
  error(console.error),
});
更合理的是分阶段:
0%   - 10%   读取文件 + demux
10%  - 60%   decode + process
60%  - 90%   encode
90%  - 100%  mux
示例:
function reportProgress(stage: string, value: number) {
  self.postMessage({
    type: "progress",
    stage,
    progress: value,
  });
}
14. 常见处理任务怎么接入
14.1 灰度滤镜
灰度处理可以用 getImageData():
function applyGrayscale(ctx: OffscreenCanvasRenderingContext2D, width: number, height: number) {
  const imageData = ctx.getImageData(0, 0, width, height);
  const data = imageData.data;

  for (let i = 0; i < data.length; i += 4) {
    const r = data[i];
    const g = data[i + 1];
    const b = data[i + 2];

    const gray = Math.round(0.299 * r + 0.587 * g + 0.114 * b);

    data[i] = gray;
    data[i + 1] = gray;
    data[i + 2] = gray;
  }

  ctx.putImageData(imageData, 0, 0);
}
但这条路会把像素拉到 CPU,高清视频会比较慢。真实项目里更推荐:
简单水印:Canvas 2D
复杂滤镜:WebGL / WebGPU shader
实时预览:尽量 GPU path
离线导出:可以接受更慢,但要有进度和取消
14.2 缩放
ctx.drawImage(frame, 0, 0, outputWidth, outputHeight);

const resizedFrame = new VideoFrame(canvas, {
  timestamp: frame.timestamp,
  duration: frame.duration ?? undefined,
});
注意:如果你改变分辨率,encoder 配置也要同步变化:
encoder.configure({
  codec: "vp09.00.10.08",
  width: outputWidth,
  height: outputHeight,
  bitrate: 1_500_000,
  framerate: 30,
});
14.3 裁剪
ctx.drawImage(
  frame,
  cropX,
  cropY,
  cropWidth,
  cropHeight,
  0,
  0,
  outputWidth,
  outputHeight,
);
14.4 图片水印
ctx.drawImage(
  watermarkImage,
  width - watermarkWidth - 24,
  height - watermarkHeight - 24,
  watermarkWidth,
  watermarkHeight,
);
15. 实际项目目录结构
一个比较干净的 demo 可以这样组织:
webcodecs-watermark-demo/
  package.json
  vite.config.ts
  tsconfig.json
  index.html

  src/
    main.ts
    app.ts

    worker/
      video-worker.ts
      worker-messages.ts

    media/
      pipeline.ts

      demux/
        mp4-demuxer.ts
        types.ts

      mux/
        webm-muxer.ts
        mp4-muxer.ts
        types.ts

      codecs/
        create-video-decoder.ts
        create-video-encoder.ts
        support.ts

      process/
        watermark.ts
        grayscale.ts
        resize.ts

      utils/
        time.ts
        events.ts
        errors.ts

    ui/
      file-input.ts
      progress-bar.ts
      download-link.ts
      preview.ts
职责划分:
| 文件 | 职责 |
|---|---|
main.ts | 初始化 UI 和 Worker |
video-worker.ts | 接收任务,调用 pipeline |
pipeline.ts | 串联 demux → decode → process → encode → mux |
mp4-demuxer.ts | 从 MP4 里拆 sample |
create-video-decoder.ts | 封装 WebCodecs decoder 创建和能力检测 |
create-video-encoder.ts | 封装 encoder 创建、队列控制 |
watermark.ts | 逐帧加水印 |
time.ts | timescale 和微秒转换 |
webm-muxer.ts / mp4-muxer.ts | 输出容器 |
16. 常见坑
坑 1:忘了 WebCodecs 不处理容器
这类错误有两种常见写法:
decoder.decode(mp4FileBytes);
new Blob(chunks, { type: "video/mp4" });
正确理解:
输入 MP4:先 demux,再把 sample 包成 EncodedVideoChunk。
输出文件:先收集 encoded chunks,再交给 muxer 写 MP4 / WebM。
坑 2:忘记 VideoFrame.close()
典型后果:
处理十几秒视频还行
处理一分钟视频开始卡
处理几分钟视频直接崩
解决:
try {
  // process
} finally {
  frame.close();
}
坑 3:timestamp 单位错
常见错误:
timestamp: sample.pts如果 sample.pts 是 MP4 timescale 单位,WebCodecs 需要的是微秒,就会导致播放速度异常。
正确:
timestamp: toMicroseconds(sample.pts, track.timescale)坑 4:忽略 DTS / PTS 区别
简单视频可能没问题,但带 B 帧的视频会出错。
原则:
按 DTS 顺序送解码器
用 PTS 作为展示 timestamp
坑 5:不做 backpressure
错误写法:
for (const sample of samples) {
  decoder.decode(chunk);
}
如果视频很长,队列可能暴涨。
更稳妥:
while (decoder.decodeQueueSize > 16) {
  await once(decoder, "dequeue");
}
decoder.decode(chunk);
坑 6:以为所有浏览器都支持同一个 codec
WebCodecs 不保证每个浏览器支持同样的 codec。你要检测:
await VideoDecoder.isConfigSupported(decoderConfig);
await VideoEncoder.isConfigSupported(encoderConfig);
并准备降级方案:
WebCodecs 不支持 → 提示换浏览器
编码器不支持 H.264 → 尝试 VP8/VP9
导出 MP4 不支持 → 导出 WebM
复杂导出 → 上传服务器处理
坑 7:把处理和 UI 都放主线程
结果:
页面卡死
进度条不动
用户以为挂了
解决:
Worker 做重活
主线程做 UI
17. 和真实工程的关系
浏览器端视频处理在真实业务里很常见:
| 业务场景 | Pipeline |
|---|---|
| 上传前压缩 | decode → resize → encode → mux |
| 视频加水印 | decode → draw watermark → encode → mux |
| 生成缩略图 | demux → decode 指定帧 → canvas export |
| 视频裁剪 | demux → 按时间选择 sample/frame → encode/mux |
| 视频转码 | demux → decode → encode different codec → mux |
| 在线剪辑器 | timeline → decode → compose → encode → mux |
| 视频会议背景处理 | MediaStream → VideoFrame → segmentation → encode/send |
| 直播推流前处理 | capture → process → encode → packetize/send |
但也要诚实:浏览器端并不是万能的。
适合放浏览器端的:
短视频
上传前压缩
简单水印
缩略图
轻量滤镜
隐私敏感、不想上传原片的处理
不适合纯浏览器端硬扛的:
超长视频
多轨复杂剪辑
大量特效
批量转码
专业级调色
复杂字幕烧录
严格兼容所有设备的 MP4 输出
工程上经常是混合方案:
浏览器端:
  - 预览
  - 轻量处理
  - 上传前压缩
  - 粗剪

服务端:
  - 最终转码
  - 多码率生成
  - HLS/DASH 切片
  - 复杂字幕和特效
  - 兼容性兜底
18. 面试可能怎么问
问题 1:如何在浏览器里给 MP4 视频加水印?
参考回答:
我会把流程拆成几步。首先用 File API 读取 MP4 的 ArrayBuffer,然后用 demuxer 解析 MP4,拿到视频轨的 codec config 和 video samples。接着把 samples 包装成 EncodedVideoChunk,按解码顺序送给 VideoDecoder。decoder 输出 VideoFrame 后,我把它画到 OffscreenCanvas,在 Canvas 上绘制水印,再用新的 VideoFrame 送给 VideoEncoder 编码。最后拿到 EncodedVideoChunk 后,还需要 muxer 把它们封装成 MP4 或 WebM。WebCodecs 只负责编解码,不负责 MP4 的解析和生成。
问题 2:WebCodecs 能不能直接处理 MP4?
参考回答:
不能。这个边界前面已经讲过:WebCodecs 只处理 codec 层的
EncodedVideoChunk ⇄ VideoFrame。输入 MP4 前要 demux,输出文件时要 mux。实战里真正要补充的是:demuxer 必须把 sample 的 timestamp、duration、keyframe 和 decoder config 一起交出来,否则后面的同步和 mux 都会出问题。
问题 3:为什么 EncodedVideoChunk 不能直接保存成 .mp4?
参考回答:
因为它只是编码帧,不是容器文件。面试里不要停在“需要 muxer”这句话,还要继续说 muxer 要写 sample 的时间、大小、偏移、关键帧索引、codec config 和音频轨信息。缺这些,播放器无法正确 seek、同步和解码。
问题 4:VideoFrame 为什么要 close?
参考回答:
VideoFrame 可能持有很大的像素 buffer 或 GPU 资源。视频每秒几十帧,如果不及时 close,内存和显存会快速上涨,导致页面卡顿甚至崩溃。通常 decoder 输出的 frame 在处理完后 close,处理后新建的 frame 在 encode 之后也 close。
问题 5:如何保证音画同步?
参考回答:
核心是 timestamp。demux 阶段要保留音频和视频 sample 的 PTS、DTS、duration 和 timescale。送 WebCodecs 时要把时间转换成微秒。视频处理后不能随便重排或丢失 timestamp。mux 阶段要把音视频各自的 sample 按正确时间线写回容器。如果只是给视频加水印且不改变时长,可以原样 remux 音频轨;如果改变帧率、裁剪时长或变速,就要同时调整音频时间线。
问题 6:为什么建议把视频处理放 Worker?
参考回答:
因为 demux、decode、Canvas 处理、encode、mux 都可能是重任务。如果放主线程,会阻塞 UI,导致页面无响应。更好的做法是主线程负责文件选择、进度条、预览和下载,Worker 负责视频 pipeline,并通过 postMessage 汇报进度和结果。
19. 实践任务
任务 1:实现一个视频抽帧预览
目标:
上传 MP4
  ↓
demux 视频轨
  ↓
decode 前 10 帧
  ↓
画到 Canvas
要求:
1. 打印每一帧的 timestamp
2. 每个 VideoFrame 使用后 close
3. 页面展示第一帧缩略图
任务 2:实现视频加文字水印
目标:
每一帧右下角添加文字水印要求:
1. 使用 OffscreenCanvas
2. 水印包含半透明背景
3. 输出重新编码后的 chunks
4. 控制 encodeQueueSize
任务 3:实现灰度滤镜
目标:
VideoFrame → Canvas → getImageData → 灰度 → VideoFrame要求:
1. 对每个像素计算 gray
2. 对比灰度处理前后的耗时
3. 思考为什么 CPU 像素处理会慢
任务 4:把处理流程移到 Worker
目标:
主线程不做视频处理要求:
1. Worker 接收 File
2. Worker 汇报 progress
3. 主线程显示进度条
4. Worker 返回 Blob
5. 主线程生成下载链接
任务 5:音频旁路 remux
进阶目标:
视频重新编码
音频不重新编码
最后 mux 到同一个输出文件
要求:
1. demux 时保留 audio samples
2. 视频处理后生成新 video samples
3. mux 时写入 video track + original audio track
4. 检查输出文件音画是否同步
20. 自测题
题 1:WebCodecs 能直接把 MP4 文件解码成 VideoFrame 吗?
答案:
不能。MP4 是容器,WebCodecs 的
VideoDecoder接收的是EncodedVideoChunk。需要先用 demuxer 从 MP4 中拆出视频 sample,再包装成 chunk 送给 decoder。
题 2:为什么 new Blob(encodedChunks, { type: "video/mp4" }) 通常是错的?
答案:
因为 encoded chunks 只是编码帧数据,不包含 MP4 容器结构。合法 MP4 需要
ftyp、moov、mdat、sample table、track metadata、codec config 等信息,必须通过 muxer 生成。
题 3:WebCodecs timestamp 通常用什么单位?
答案:
通常使用微秒。MP4 sample 的时间一般是 track timescale 单位,所以要用
timestampUs = pts / timescale * 1_000_000转换。
题 4:有 B 帧时,DTS 和 PTS 有什么区别?
答案:
DTS 表示解码时间,PTS 表示展示时间。有 B 帧时,解码顺序和展示顺序可能不同。通常要按 DTS 顺序把 sample 送给 decoder,但 chunk 的 timestamp 应该使用 PTS。
题 5:为什么 VideoFrame.close() 很重要?
答案:
因为
VideoFrame可能持有很大的像素数据或 GPU 资源。视频处理每秒会产生大量帧,如果不释放,会造成内存或显存持续增长,最终导致卡顿或崩溃。
题 6:给视频加水印时,WebCodecs、Canvas、Muxer 分别负责什么?
答案:
WebCodecs 负责把压缩帧解码成
VideoFrame,以及把处理后的VideoFrame编码回EncodedVideoChunk。Canvas 负责绘制原始帧和水印。Muxer 负责把编码后的 chunks 封装成 MP4 或 WebM 文件。
题 7:为什么要控制 decodeQueueSize 和 encodeQueueSize?
答案:
因为 decoder 和 encoder 都是异步队列模型。如果生产速度大于消费速度,队列会不断变长,占用大量内存或显存,导致页面变慢甚至崩溃。控制 queue size 是 backpressure 的一部分。
题 8:如果只给视频加水印,不改变时长,音频可以怎么处理?
答案:
可以不解码音频,直接把原 MP4 的 audio samples 旁路 remux 到输出文件。这样可以减少计算量,也更容易保持音画同步。
21. 本章总结
本章你要带走这条主线:
MP4 不是直接给 WebCodecs 的。
EncodedVideoChunk 才是给 VideoDecoder 的。
VideoFrame 才是给 Canvas/WebGL/WebGPU 处理的。
处理后的 VideoFrame 才是给 VideoEncoder 的。
EncodedVideoChunk 不是最终文件。
最终文件还需要 muxer。
最核心的工程公式:
Input MP4
  = container

Demuxed sample
  = encoded frame data + timestamp + keyframe info

VideoDecoder
  = EncodedVideoChunk → VideoFrame

Canvas/WebGL/WebGPU
  = VideoFrame → processed VideoFrame

VideoEncoder
  = processed VideoFrame → EncodedVideoChunk

Muxer
  = EncodedVideoChunk[] + metadata → MP4/WebM
最容易踩的坑:
1. 忘记 demux
2. 忘记 mux
3. 忘记 timestamp 转换
4. 忘记 DTS / PTS
5. 忘记 VideoFrame.close()
6. 忘记 backpressure
7. 忘记 Worker
8. 忘记 codec 支持检测
面试时最稳的回答模板:
浏览器端视频处理通常是“容器层 + 编解码层 + 帧处理层 + 重新封装层”的组合。MP4 先由 demuxer 拆出 video samples,再交给 WebCodecs 解码成 VideoFrame。逐帧处理可以用 Canvas、WebGL 或 WebGPU。处理后用 VideoEncoder 重新编码成 EncodedVideoChunk。最后如果要保存成文件,还必须用 muxer 写成 MP4 或 WebM。WebCodecs 只解决编解码,不解决容器解析和封装。
22. 下一章衔接:进入 Web Audio
到这里你已经能处理视频帧了,但真实媒体文件通常还有音频。
下一章会进入:
AudioContext
AudioNode graph
音频播放
音量控制
混音
滤波
可视化
录制
也就是从:
VideoFrame pipeline扩展到:
Audio graph pipeline再往后,我们会把两条线合起来:
视频:WebCodecs + Canvas/WebGL/WebGPU
音频:Web Audio + AudioData/AudioEncoder
封装:Muxer
同步:timestamp / timeline
最终目标是做出真正能讲清楚、也能跑起来的浏览器端音视频处理 demo。